
Shoulder Pain Exercises: A Functional Approach To Managing Shoulder Pain
A) Lets make sure the problem is with the shoulder. We know that a herniated disc in the neck, disc tear and facet joint problems can cause shoulder pain as well as neck muscle strain. Therefore, it is important to have your condition properly diagnosed. One way to tell if the pain is from the neck is to do basic neck stretching range of motions to see if this is causing your shoulder pain.
If there is no problem with these neck motions, the problem is most likely with the shoulder and we can look into part B of determining if the shoulder pain exercises might help. Shoulder problems are usually aggravated or produced by moving the shoulder and arm, especially lifting the arm to the front or side as well as putting your hand behind your back, often due to pain from rotator cuff tears.
B) After determining the neck is not the source of shoulder pain, lets take a brief questionnaire to see if the exercises can be done without additional assistance.
| Yes | No | Shoulder Pain Exercise Questions |
| Are there periods during the day when you have no shoulder pain? | ||
| Is there pain only when you move your arm and shoulder? | ||
| Is the pain less with your arm at the side or with support across the body? | ||
| Is the pain worse when ther is prolonged periods of holding your arm in a raised position? Eg, driving, painting. | ||
| Is the pain aggravated by lying on the affected shoulder side? | ||
| Is the pain above the elbow? | ||
| If there is pain in the arm, does it sometimes go away even if there is still shoulder pain? | ||
| Have you suffered several episodes of shoulder pain during the past months or years? | ||
| Between these episodes, is the shoulder pain free? | ||
| Between these episodes, can you move the arm freely without pain? |
If you have answered yes to 5 or more of the questions, chances are you can benefit from the shoulder pain exercises. If you have answered yes to 4 or fewer questions, then you may need some type of specialized treatment and should consult a health care professional or physical therapist for assistance.
What Is The Goal?
The goal of these particular exercises for shoulder pain is to get rid of the pain by restoring function. This may be possible in some cases. For some, it may only be 50 or 75%, however, for many who have suffered shoulder pain for years and have disability or restricted daily activities, this may bring about a significant improvement in the quality of life.
When using the shoulder exercises for pain relief, you should go just to the edge of pain, slightly into the pain, then relax by releasing the pressure and return to the staring position. When the stretching is released, the pain should return to the starting level or less. If it does not, you are overdoing it and need to use less force. In this manner, pain is used as a gauge to carefully monitor the exercise.
When using the shoulder exercises for stiffness, you can apply more pressure. Once the shoulder pain is gone, maintaining good posture is a crucial part in preventing the return of shoulder problems.
What Are The Effects Of The Shoulder Pain Exercises
The effects of the exercises are on the intensity and location of pain. The effects to monitor while doing the exercises are:
1) The pain may go away
2) The pain may increase or decrease
3) The pain may move to a different location
In some cases the effects of the exercises are rapidly noticed. In other cases it may be noticed over days or perhaps weeks. Pain that is felt in the shoulder and into the arm may become more localized to the shoulder. This is a good effect of the exercises. When starting the exercises, you may notice an increase in pain. This is normal and may be anticipated, however, the pain should reduce back to the original level or lower in a short period of time. This should be noticed during the first exercise session. If the pain continues to increase or spreads further down the arm or into the neck, stop the exercises and consult a health care professional.
New shoulder pains are commonly felt due to moving in ways the body is not used to. Continue with the exercises and this should slowly get better within a few days. Again, if the pain increases with no change or the pain goes further down the arm, stop the exercises.
If you are in significant pain, go slowly and carefully. If you have been experiencing pain for a long time, the exercises may take longer to have an effect, however, where improvement is noted, continue progressing. It is recommended that you not do other forms of exercises during this period. Give some time for the exercises to take effect. Only consider other exercises if improvement stops.

Shoulder Pain Exercises Overview
This is a systematic approach to restoration of function in order to relieve pain. Thus, there is a sequence to which the exercises need to be done. Become familiar with the exercises and the order in which they are performed. It is recommended to try them with your non painful shoulder first, thereby noting the feel in a normal, pain free manner to compare with the painful shoulder. When starting with the painful shoulder, you must go slowly and easily. Make sure you read the full description for each of the shoulder pain exercises and do not just go by the pictures alone.
Exercise 1
The swing exercise puts the shoulder through a range of motion. This part of the shoulder pain exercises is the starting point. It is a slow swinging of the arm in a forward and backward motion. It should be done in a pain free range of motion. This exercise can be done for significant levels of shoulder pain. It can help with pain from sleeping on the painful shoulder when you get up in the morning or for pain from getting dressed, as in placing your arm through a sleeve. So, this is where to start. If you can not do this exercise, even in a small range of motion, consult a health care practitioner.
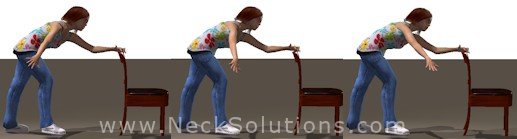
Position yourself leaning forward. You can use a chair or a table. Some can support the non painful shoulder on the forward leg. The painful shoulder should be hanging down and completely relaxed. Slowly and carefully swing your arm back and forward in an arc of motion that is not painful. Some will find that holding weight in the hand of the painful shoulder will help decrease pain. This can be done using a can of food or a small weight. Repeat this motion 10 times and do it 6 to 8 times throughout the day, about every 2 hours. Note that some will not obtain more relief holding a weight. In some instances where there is instability, there may be a noise or a clunking type feel. If this is the case, you may need to pull the shoulder or retract it back some until this feeling is gone to complete the motion. You can see this in the last of the pictures above, where the shoulder is elevated some to increase stability. In general, a relaxed, smooth and swinging motion.
Exercise 2
This part of the shoulder pain exercises places the shoulder in extension, which is reaching backward. This is used for both treatment and prevention of shoulder pain, especially when this motion is restricted more than the non painful shoulder.
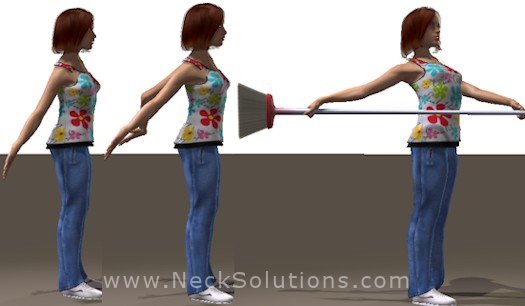
There are a number of ways this can be done; standing alone, with a chair, against a wall and using a pole or a broom, however, start doing this without using a chair or wall.
Stand in good posture with your arms at your sides. Stretch the affected arm behind the back. When you are ready, use the other arm to push the painful shoulder arm further away from your back to the point where there is a nice stretch. Hold this for a slow count of 3, and then return to starting position. Each repetition, try to extend your arm a bit further than the last. When you are ready, you can use a pole (broom, golf club) in both hands to get more extension of the shoulder.
When you are ready, you can progress to adding more pressure by using a chair, table or a wall to extend the arm further. Initially, just hold the arm backward and, when you are ready, slowly bend the knees to stretch the arm. The higher the arm is initially placed, the less you will have to bend. Do this exercise with 10 repetitions, 6 to 8 times – about every 2 hours.
A note regarding hand position. In most cases, the hand is positioned down. In some cases, the hand can be placed with fingers pointing upward, especially on the wall. This can be determined by feel. Position according to which provides the greatest pain relief for the shoulder. Sometimes this can go according to mechanism of injury. If you are throwing a ball and injure your shoulder, point the fingers down during the stretch. If you were carrying a heavy load and it slipped and you caught it with the bad shoulder hand pointing down, you can point the fingers up during the stretch.
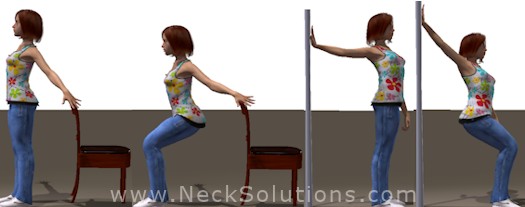
Exercise 3
This part of the shoulder pain exercises places the shoulder in internal rotation, placing the hand up behind the back.
Like the extension part in the shoulder pain exercises, this can be used for treatment and prevention and is beneficial if the painful shoulder arm is more restricted with this motion than the good arm.
Stand in good posture and place the hand of the painful shoulder behind your back. Keep the back of the hand against the back and slowly move it up the back. Try to focus the motion and concentrate on quality of motion. If all you can do for now is hold it at a low position, that is fine. Later, when you gain more motion and flexibility, you can use a towel with your good arm to help pull the other arm up higher.
Hold the position for a slow count of 3, breathing normally and then return to the starting position with the arms at your sides. If you can, each time try to go a bit further up. Repeat this 10 times, 6 to 8 times per day – about every 2 hours.
If this exercise is too painful to do, discontinue it and go back to part 2 of the shoulder pain exercises for a few days before attempting number 3 again.
Exercise 4
This part of the shoulder pain exercises places the shoulders through elevation while lying down. This can also be done in the standing position if lying down is not practical.
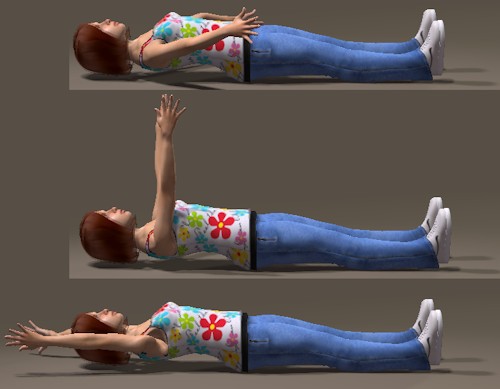
Elevating the arms uses a motion of lifting them forward and upward. It is especially useful if you are having difficulty raising your arm in front while standing. This is a preparation exercise for the next one.
Lay flat on the floor or a bed without using a pillow. In general, lock your fingers together and use the good arm to help the bad one. If there is instability in the finger locked position, you can keep your arms further apart as pictured. Start with your hands interlocked and resting on your body or, if you need the arms further apart, you can start with your arms at the sides, resting on the surface. Slowly raise the arms over the head until there is a stretching. Hold for a slow count of 3 and return to the starting position. Try to go a bit further each repetition. Do this 10 times, 6 to 8 times during the day – about every 2 hours.
Exercise 5
This part of the shoulder pain exercises uses elevation of the arms in a standing position against a wall. It is a progression from the fourth part of the shoulder pain exercises.

Stand at a wall or door with your arm at around head level and slowly raise the arms upward against the wall until a nice stretch is felt. Hold for a slow count of 3 and return to starting position. Each repetition should go a bit further than the last if possible. Repeat 10 times, 6 to 8 times per day – about every 2 hours.
If this is too painful, return to shoulder pain exercises part 4 a few days prior to attempting this again.
Exercise 6
This part of the shoulder pain exercises uses abduction, moving the arm away from the body, and isometric tension to strengthen rotator cuff muscles around the shoulder, once proper motion has been restored using the previous exercises. This can be done against a wall or a table, something that will not move when pushing against it. There are variations of this using the arm positioned in more in front of the body and using certain exercise equipment, however, this is the starting point for this part of the shoulder pain exercises.

Stand in good posture with the painful shoulder side near a wall. The feet are slightly apart and hands by the sides. Slowly push the painful shoulder out, touching the wall with the back of the hand and wrist. Press against the wall until you feel pressure, but do not strain. Hold this for a slow count of 3 and then return to starting position. Try to push a little harder each repetition. There may be discomfort, but no sharp pain. Do 10 repetitions, 6 to 8 times per day – about every 2 hours.
Exercises Final Notes
In doing these exercises, you go to the edge of pain and then release. If you find doing exercises 2 through 5 are pain free and the motion range is the same as the non painful shoulder, go to exercise 6 and begin strengthening. Progress at a steady pace as you notice improvements in a few days. As soon as you can perform one exercise comfortably, progress to the next in order. In most cases, improvement or resolution is noted within 3 to 12 weeks.
If you can not do the shoulder pain exercises 2 through 5 after a couple of weeks, there may be capsulitis or what is sometimes called a frozen shoulder.
Frozen Shoulder
Movement of the shoulder is painful in every direction and it becomes increasingly stiff. It can result from an injury or appear usually after 40 years of age with no apparent reason.
There are usually 3 phases of a frozen shoulder. Each phase can last about 3 months and it may take up to 18 months or longer to resolve:
1) The shoulder has reasonable mobility, but is increasingly painful throughout the day, disturbing sleep at night.
2) The shoulder pain and stiffness increases to the point where it affects daily life activities. Exercising is usually painful.
3) The shoulder pain and stiffness eases and motion is restored. Exercises at this stage can help.
During the phases of a frozen shoulder, you can do the shoulder pain exercises 1 to 3 for 3 weeks. These should be done very carefully. If there is no improvement of pain or motion, consult a health care provider to confirm a diagnosis and for recommendations. During the final phase, you can do the shoulder pain exercises for 3 to 6 months, as recovery can be slow.
When the pain is gone, observe proper posture habits to keep it from returning. If the pain does return, do shoulder pain exercises 1 and 2. As these exercises and progressions can be difficult to master and results may be slow because of poor technique or lack of motivation, you may need the help of an expert and you can find a certified therapist using these techniques here.
It is also beneficial to do specific muscle treatment to areas of shoulder strain. Effective use of this can help speed recovery.